If you are looking for converting your TechSmith Camtasia project in latest version to older version, that is possible. In TechSmith Camtasia: How downgrade to older version, we are going to talk about How to downgrade Camtasia version 2021 file to Camtasia 2018 version. Register and subscribe to our website and get a SUVRATOONS comic book FREE.
Continue reading “TechSmith Camtasia: How to downgrade to older version.”How to create a strong password
Security is the first thing that comes to our mind when we are dealing with digital applications. For that, you need a strong password. Here we are going to learn how to create a strong password.
Continue reading “How to create a strong password”Adobe Captivate issue of displaying Failure text box.
Adobe Captivate is a software which is very famous in the eLearning domain. It is useful in creating eLearning content. It has few issues, and while doing research about one such issue I had not found any proper answers on the internet, so thought to share the solution I found out during my research. We are discussing the latest version of Adobe Captivate 2019 Release. Hope you have intermediate/Advance knowledge about Adobe Captivate.
Issue: “Failure” display is not working in “Click box” object from the “Interactions” menu.
Case: It’s a very weird problem, it seems a bug in the software itself.
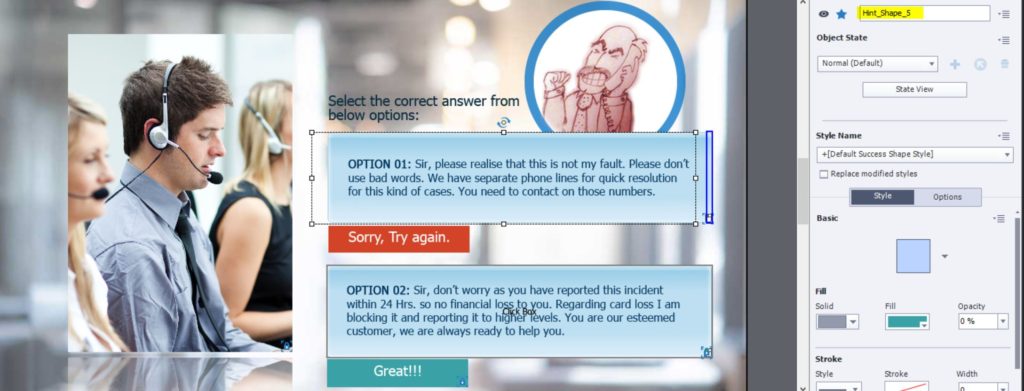
When you place two text boxes as right and wrong answers, to activate it, we need to place ” Click box” from “Interactions” menu. With this “Click box” comes three text cum click areas which are “Success”, “Failure” and “Hint”.
When someone clicks on “Click box”, as per standard functionality of “Click box” one/two objects should show up (Success-Hint or Failure-Hint etc.)
But you just want to show “Success” or “Hint” then it’s fine because it will work fine. But if you want to show the “Failure” text message after clicking on “Click box” your problem starts, it will not show the “Failure” message.
Solution:
- Very simple solution but little weird…..when you want to show “Failure” message, just use the “Hint” area to click and reduce the “Click box” to the minimum (don’t delete it completely)…Whoa!!! problem solved 🙂
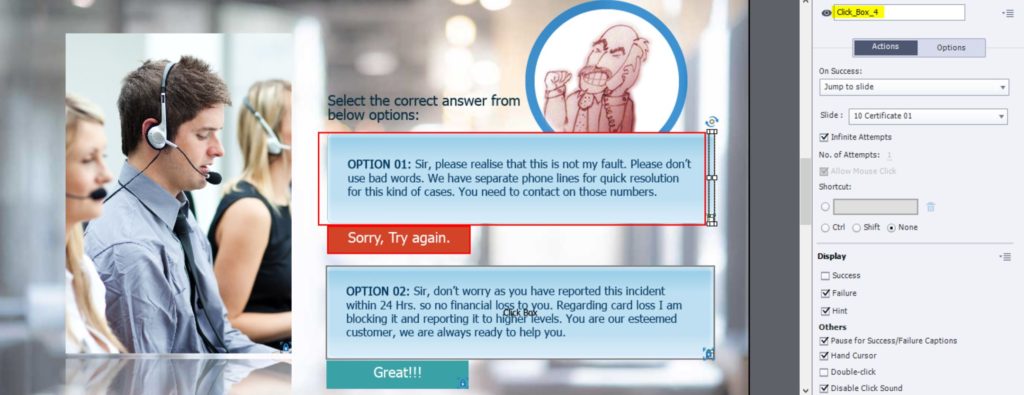
- Don’t forget to select “Success”, “Failure” and “Hint” options as per your choice from Property area on the right. Check Figure 1.3.
- For “Sucess”, just place “Click box” on the text box which you think will be the correct answer. After someone clicks on this “Click box” success text will appear.
- Check Figure 1.2 and Figure 1.3 for more understanding.
Note: Above procedure is for students/professional/users with intermediate knowledge of Adobe Captivate 2019 and not for beginners.
Adobe, webGL and HTML5
I had written a blog post for my company website, please check the link:
http://www dot xoriant dot com/blog/javascript-2/web-graphic-library-and-html5.html
Flash ActionScript – getURL in AS3
After a long time I am writing something…during my project I found out something interesting in Flash and JavaScript function. This will be useful for people with basic knowledge in Actionscript. So let’s discuss it here.
First we will discuss about the difference between AS2 and AS3 script on Flash button. Previously in AS2 it’s very easy to write script on Flash button.
AS2 script on Flash button:
on(release){
//Write your action
trace(“Button has been pressed”);
}
And function should be like this (this should be placed on the keyframe of timeline (make actionscript layer) :
function myFunction(){
//Write your action
trace(“Hello”); //write trace option
}
Above example was quiet easy with AS2, now let’s see same example with AS3:
Important point to remember is that in AS3 you can’t write script on button. Just write it on keyframe in timeline (make actionscript layer). And give instance name to your button e.g. HelloButton. Now write the button script on keyframe of timeline:
AS3 script for Flash button:
HelloButton.addEventListener(MouseEvent.CLICK, myFunction);
Here, we have use button name i.e. HelloButton. And a function i.e. myFunction
In AS3 function is written as:
function myFunction (event:MouseEvent):void{
trace(“Hello”);
}
In above function, remember to add “event:MouseEvent” and “:void” as compare to AS2, which tells that on which mouse event this function should execute.
Now let’s discuss about simple script of “getURL”. Previously it was easy to open a webpage on click of a Flash button. You just need to put this script on Flash button. See example:
on(release){
//getURL(“http://www.google.com”, _blank);
}
After clicking this button it will open an http://www.google.com link in new window.
But now if you just put this script on Flash button and publish HTML, you will find that it’s not working….don’t worry this is just a simple glitch within your HTML…….try to find out this param tag…in HTML:
<param name=”allowScriptAccess” value=”always”/>
Make sure that….value=”always”….if you want to run getURL script on Flash button….Now your Flash button works perfectly in HTML.
Now learn something interesting, capture Flash button event in Javascript of HTML page. Check AS2 and AS3 versions:
AS2 version:
On Flash button write this script:
on(release){
getURL(“javascript:myfunction()”);
}
In above script, “myFunction()” is a javascript function which is present in HTML.
In HTML, where you are going to run this Flash button, just write javascript function “myFunction()” in <body> section. Check this:
JavaScript Function in HTML
<script language=”JavaScript”>
function myfunction(){
alert(“Hello World”);
}
In the object tag for the SWF file in the containing HTML page, set the following parameter:
<param name=”allowScriptAccess” value=”always” />
Now check above scenario in Actionscript 3:
AS3 version:
import flash.external.ExternalInterface;
Instead of “getURL”, in AS3 we should use “ExternalInterface” classes. For more details check link: http://help.adobe.com/en_US/FlashPlatform/reference/actionscript/3/flash/external/ExternalInterface.html
import flash.events.Event;
HelloButton.addEventListener(MouseEvent.CLICK, myFlashFunction);
Above code is for Flash button with instance name: “HelloButton”, and when someone press this button it execute “myFlashFunction”(JavaScript function).
function myFlashFunction (e:Event):void{
ExternalInterface.call(“myfunction”, HelloButton.name);
};
myFlashFunction is a Flash function which runs javascript function(i.e. myfunction) in HTML file.
And in HTML, place this javascript function:
<script language=”JavaScript”>
function myfunction(){
alert(“Hello World”);
}
In the object tag for the SWF file in the containing HTML page, set the following parameter:
<param name=”allowScriptAccess” value=”always” />
Now run HTML file in Internet Explorer (browser). And when you press Flash button in SWF file in the containing HTML page, javascript code catch the Flash button event. This way you can catch any Flash event in javascript and use for many purposes. Hope this will be helpful for those who want to understand basic event catching with JavaScript from Flash.
Missing Character entities in Dreamweaver CS5
It’s been long time that I haven’t update my blog, I know but I was so busy in my schedule that didn’t find out time to write some good article. I had done some fantastic work during this time. And during my work find out something interesting in Dreamweaver CS5, which I want to share with you all.
In XSLT, some characters are not allowed in certain contexts. For example, you cannot use the less than sign (<) and the ampersand (&) in the text between tags or in an attribute value. The XSLT transformation engine will give you an error if those characters are used incorrectly. To solve the problem, you can specify character entities to replace the special characters.
A character entity is a string of characters that represents other characters. Character entities are either named or numbered. A named entity begins with an ampersand (&) followed by the name or characters, and ends with a semicolon (;). For example, < represents the left angle bracket character (<). Numbered entities also start and end the same way, except that a hash sign (#) and a number specify the character.
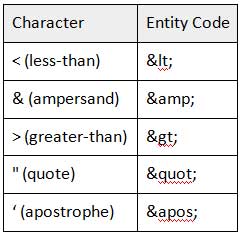
XSLT has the following five predefined entities:
Figure 1.1: Predefined entities
So now biggest question is that suppose if we try to write some special character, than from where we get the ‘Entity Code’ for that special character. It’s easy, look up the missing character in the character entity reference page on the W3C website i.e. www.w3.org/TR/REC-html40/sgml/entities.html
Let’s select ‘micro’ entity in the webpage. Write down its Entity and CDATA details, which are as follows: Entity: micro CDATA: µ
Figure 1.2: Entity and CDATA for ‘micro’
Now open XML file present in Dreamweaver application folder (where you install Dreamweaver, in Program files)….Configuration/DocumentTypes/MMDocumentTypesDeclarations.xml
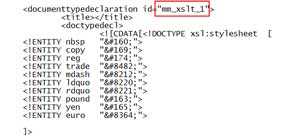
Open this XML file in text editor or XML editor of your choice. Locate the text ‘mm_xslt_1’ and,
Figure 1.3: mm_xslt_1 declaration
after that place Entity and CDATA in appropriate location. Save the XML file.
Figure 1.4: Entity and CDATA
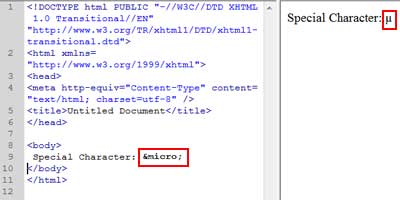
Now, open Dreamweaver CS5, and in Code view write µ …………….. Its amazing to see micro sign on Design view of Dreamweaver CS5.
Figure 1.5: ‘micro’ sign in Code and Design view
You can experiment with many symbols available in W3C website.
Reference: Dreamweaver help, other internet links
Swift 3D plug-in: Convert 3D animation to vector
Friends, thanks for your encouraging comments on my articles. Some ask that why I am not updating my blog regularly, one reason for not writing on regular basis is due to less time availability. Due to recession and heavy work pressure, I do not have much time to write research articles. I don’t want to write those news items which you easily gets on every website, I try to write article after doing complete research on the subject.
Wait for my next article which will most probably on interactive 3D model. I am doing research on the same, and already made a really cool interactive 3D model. So just wait for my new article.
Here we talk about software (plug-ins) which helps to convert 3D animation into vector animation (i.e. Flash SWF). Isn’t it sound interesting?
Electricrain, a company made a software plug-ins for LightWave 3D and 3ds Max i.e. ‘Swift 3D LW’ ; and ‘Swift 3D MAX’. With the help of these plug-ins, users of 3ds Max and LightWave 3D can render their 3D scenes in high-quality, low bandwidth vector or raster Flash animations.
These plug-in are powered by industry-leading RAViX 4 vector rendering technology. Swift 3D plug-ins gives superior Flash integration and additional export formats including Adobe Illustrator, EPS, SVG and Toon Boom’s PNT format.
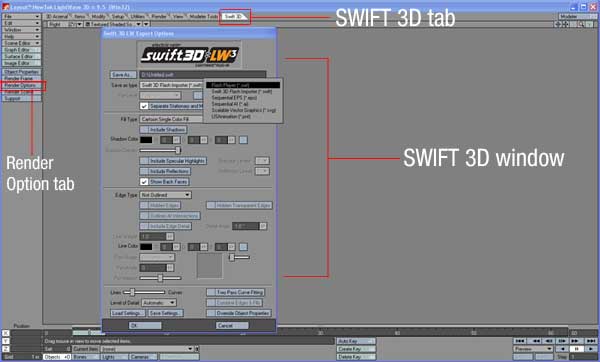
It is simple to use plug-in. You just need to install it (according to the installation manual), and it appears into your software as shown in below Figure.
You just select your output format i.e. swf, eps, ai etc. in the SWIFT 3D window and render it, you will get the desire output in vector format. WOW…quite easy and very useful. I have use lots of SWF files in my project and it is quite easy to show a 3D model/animation made in LightWave3D in Flash with full control. You just need to import the SWF (3D animation) file into your Flash project and your 3D animation would work perfectly in Flash without consuming much memory. Same thing happens with 3ds Max.
Just download a trial and enjoy it!
For more information, please check the link: erain dot com/products/plug-ins/
Reference/Image (First Image) courtesy: erain dot com